Practice to Play B Major Guitar Chord

Janvi Arora
- 1 October, 2024
- 7 min read

B Major is a mighty chord, not just in guitar but also in musical composition.
Table of Contents
As you know, each chord has its own characteristics and personalities. According to famous composer Schubert, the B major chord is a strongly colored chord that defines wild passions and is made from some of the most glaring colors, such as anger, rage, fury, and all the burdens of the heart.
As a result, it is used in almost every love song such as “What Can You Lose?” by Madonna. When you first play the B major chord on your guitar, you will be blown by its majestic sound and what this specific chord brings to the composition. But in order to properly learn how and where to use it, you need to do more than just place your fingers at the right spot on the fretboard.
Today, in this blog, we are going to show you how to play the B major chord, its different variations, the best guitar exercise you can do to train yourself, and all the other vital information that eases the task of learning it.
What Is The B Major chord?
In guitar B major is known to be a quintessential chord to learn even though it is not best suited for playing melancholic songs as the chord produces more of an uplifting tone. Songs like Billie Jean by Michael Jackson and Live and Let Die by Guns’ n Roses show that B Major chords can inspire artists to create some of the most epic and uplifting songs for a wide range of styles.
Notes Present In B Major Chord?
In its generic form, the B major chord is played using a triad shape, which starts with its root note (B), then D# (sharp), and F# (sharp). One can add more notes to the B major to make it sound more comprehensive and fuller. But it is important not to overdo it.
How To Play the B Major Chord?
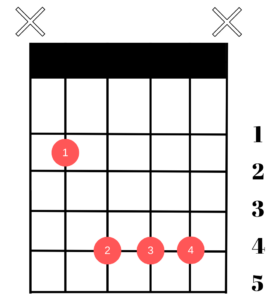
B major has a barre version, meaning you have to use the index finger to barre multiple strings to leave no open strings. But if you are looking for a much simpler way of playing it, then use this version of the B major chord, which sounds amazing when played on an acoustic guitar.

- Step – 1: Place your index finger (1) on the 2nd fret at the 5th string.
- Step – 2: Place your ring finger (3) on the 4th fret at the 4th string.
- Step – 3: Place your pinky finger (4) on the 4th fret at the 3rd string.
- Step 4: Play strings from 1st to 5th.
You can learn acoustic guitar through our beginner guitar lessons.
Different Versions Of B Major Guitar Chord
Apart from the version we showed in the above section, there are other ways of playing the B major chord, which we have shown here. These other versions are a bit more difficult to play as you use your index finger as a barre.
Many basic chords have open strings, so you don’t need to barre them when you strum them. With the B major chord, however, you need the strength of one extra finger to fret every note. Let’s see how you will form a barre to play different versions of the B major chord.
1 B Major Chord On 2nd Position
Here, you will use all your fingers on various locations of the fret to play the B major chord. Keep in mind that you will not be using any finger to make a barre. Here’s how you need to play it. On the other hand, you can play the same version of the B major chord by using the ring finger as a barre on the 4th fret.
- Step – 1: Place your index finger (1) on the 2nd fret at the 5th string.
- Step – 2: Place your middle finger (2) on the 4th fret at the 4th string.
- Step – 3: Place your ring finger (3) on the 4th fret at the 3rd string.
- Step – 4: Place your pinky finger (4) on the 4th fret at the 2nd string.
- Step – 5: Play strings from 2nd to 5th.
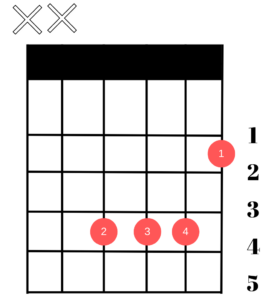
2 B Major Chord On 7th Position
This is the Position where you must use the index finger on the 7th fret. You will have to place your index finger so that it does not make contact with the 5th string, 4th string, and 3rd string. Apart from this, here’s how you will place all the other fingers on the fret to play this version of the B major chord.
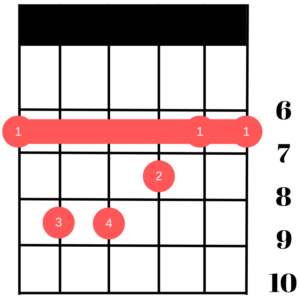
- Step – 1: Place your index finger (1) on the 7th fret at the 1st, 2nd and 6th string.
- Step – 2: Place your middle finger (2) on the 8th fret at the 3rd string.
- Step – 3: Place your ring finger (3) on the 9th fret at the 5th string.
- Step – 4: Place your pinky finger (4) on the 9th fret at the 4th string.
- Step – 5: Now play all six strings from bottom to top.
3 Open B Major Chord Position
If you are facing problems when playing different versions of the B major chord, including barre versions, start with an open position such as this one. This particular version of the B major requires less finger dexterity and stamina.
As a result, this version is also considered the first alternative to the default B major chord. Even though you are not playing all 6 strings in this version, it still produces a fuller sound.
- Step – 1: Place your index finger (1) on the 2nd fret at the 1st string.
- Step – 2: Place your middle finger (2) on the 4th fret at the 4th string.
- Step – 3: Place your ring finger (3) on the 4th fret at the 3rd string.
- Step – 4: Place your pinky finger (4) on the 4th fret at the 2nd string.
- Step – 5: Now strum strings from 1st to 4th.
Best Practices To Play B Major Barre Chord On Guitar
B major barre chord is the one that can make your fingers ache, and when you start playing it for the very first time, you are going to feel a lot of discomfort in your barring finger. Besides the pain and the ache, there is one other challenge you will be facing: playing the barred version in such a way that it sounds clean. But if you follow these simple yet effective practices, you can ease the pain of playing barre chords and free any unwanted buzzing.
- One of the first things you need to do is pay close attention to how much pressure your fingers put on each string. If the pressure is inconsistent, meaning each string is not pushed down against the fretboard, then the strings will keep on buzzing.
- Instead of using the front part of your finger, it is better to use the side part, which is also the hardest part. This makes it easier for you to put pressure on all strings. To get to the right angle for your finger, you need to place the index finger first on the fret so that the palm of your hand is facing downward, and then you can roll your index finger to its harder side.
- You need to keep your index finger close to the fret, and it should not be put directly on top of it.
- If you find some of the strings don’t sound right, then, you have to curve your fingers a bit more to stop the sound.
Try the Guitar lessons, bass lessons , guitar song lessons and bass song lessons at torrins and master the B major Guitar chord.