
10 Essential Barre Chord Shapes

Janvi Arora
- 30 September, 2024
- 10 min read
Table of Contents
So it’s been a while since you have started learning guitar chords and now you can confidently say that you “get the hang of it.” In truth, not many people are able to move past the first few months of learning different guitar chords. But you did, and that’s a big achievement.
But now is the time to take things up a notch. If you really want to advance in your guitar playing and make it more than just a hobby, then the next step for you is to learn barre chords.
We know that by mentioning barre chords, we might have struck fear in your mind, but don’t worry. With the help of this blog, we are going to show you how you can play the top 10 essential barre chord shapes that makes it possible for you to move ahead in your journey of guitar playing.
Let’s look at how different barre chord shapes enhance your playing and what finger placement you should be using that gives you maximum flexibility and produces the best of the best sound.
i. The E Major Barre Chord Shape
The E barre chord is quite similar to the E open chord; the only difference here the need to place your fingers on the 12th fret instead of the 14th, and the index finger (1) will be used as a barre across the 12th fret.

- Step – 1:- Use your index finger (1) to make a barre on the 12th fret for all six strings.
- Step – 2:- Place your middle finger (2) on the 13th fret at the 3rd string.
- Step – 3:- Place your ring finger (3) on the 14th fret at the 5th string.
- Step – 4:- Place your pinky finger (4) on the 14th fret at the 4th string.
- Step – 6:- Strum all 6 strings from down to up.
ii. The A Major Barre Chord Shape
Lots of beginners should learn how to use their 2/3/4th fingers to play this barre chord shape. Other methods of A major barre might seem easy at first but 99% of the time you will find that there is no way you can swiftly perform the transition of chords using them.
Moreover, in most cases, you need to mute notes that are present on the thinnest string. As a result, we are using a tricky chord shape for the A major barre, but once you are able to switch between the chord shapes using this version quickly, you will surely thank us.
- Step – 1:- Place your index finger (1) across the 5th fret.
- Step – 2:- Place your middle finger (2) on the 6th fret at the 3rd string.
- Step – 3:- Place your ring finger (3) on the 7th fret at the 5th string.
- Step – 4:- Place your pinky finger (4) on the 7th fret at the 4th string.
- Step – 5:- Strum all 6 strings from down to above.
iii. The C Major Barre Chord Shape
The C major barre chord shape is similar to that of an open A chord shape. The only difference is that you will be using fingers to barre chords. You will be playing this shape on the 3rd fret of the guitar, and even though at first it might look tricky, with enough practice, it gets easier and faster.
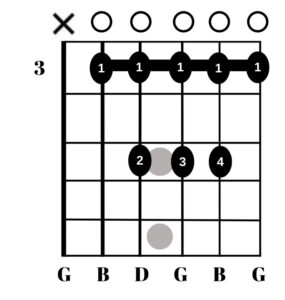
- Step – 1:- Place your index finger (1) on the 3rd fret from the 1st string to the 5th to form the barre.
- Step – 2:- Place your middle finger (2) on the 5th fret at the 4th string.
- Step – 3:- Place your ring finger (3) on the 5th fret at the 3rd string.
- Step – 4:- Place your pinky finger (4) on the 5th fret at the 2nd string.
- Step – 5:- Strum strings from 1st to 5th only.
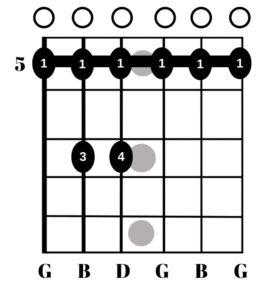
iv. The D Major Barre Chord Shape
This version of the D major barre chord shape requires you to have extra flexibility and strength in your ring finger as it will be used to press down three strings at the same time on the same fret. This chord shape is much easier to play on an electric guitar because the strings present in it does not have high string tension.
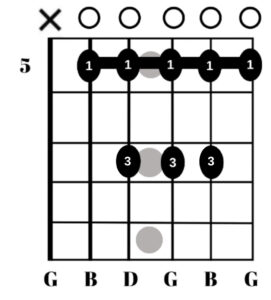
- Step – 1:- Place your index finger (1) on the 5th fret across the 1st to 5th string to make a barre.
- Step – 2:- Place your ring finger (3) on the 7th fret from the 2nd string to the 4th string.
- Step – 3:- Strum strings from 1st to 5th.
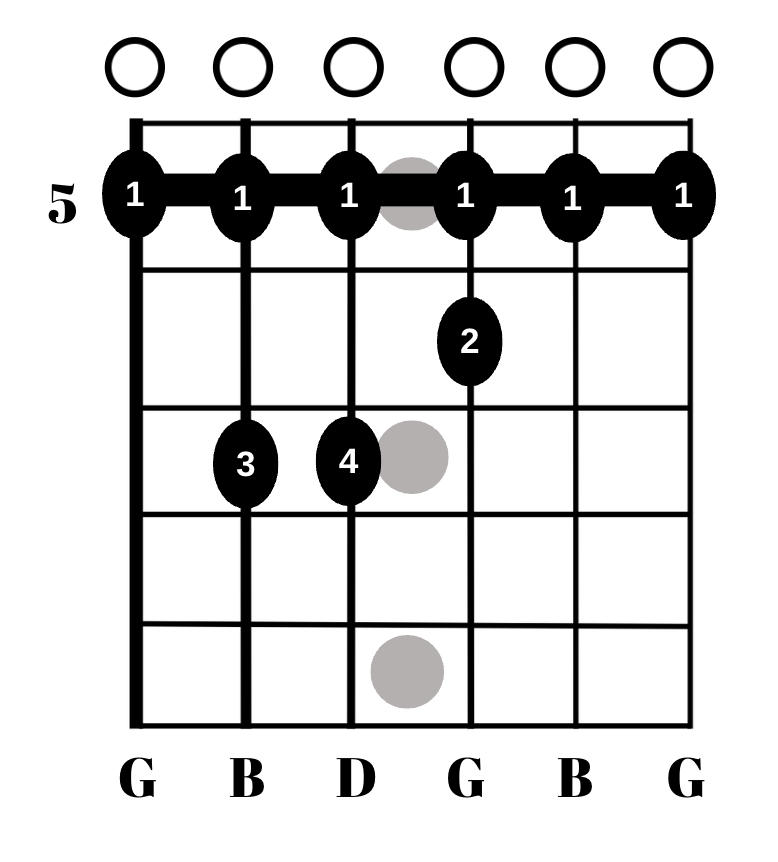
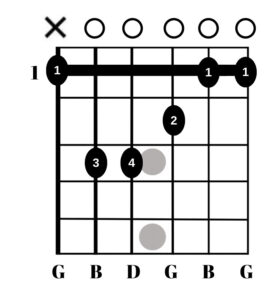
v. The G Major Barre Chord Shape
G major barre shape is the second most common shape for playing the G note. In addition to this, the G chord shape is foundational for guitar learning, and it may look intimidating at first. But, once you are able to place your fingers at the right spot on the fretboard, you will be able to discover a number of musical compositions that were hidden before.
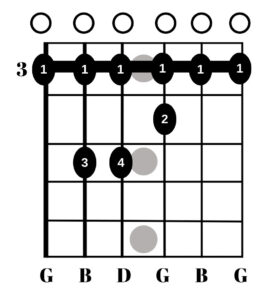
- Step – 1:- Place your index finger (1) across the 3rd fret to form the barre.
- Step – 2:- Place your middle finger (2) on the 4th fret at the 3rd string.
- Step – 3:- Place your ring finger (3) on the 5th fret at the 5th string.
- Step – 4:- Place your pinky finger (4) on the 5th fret at the 4th string.
- Step – 5:- Now, Strum all 6 strings from bottom to top.
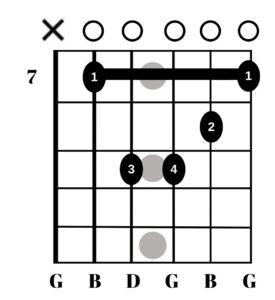
vi. The A Minor Barre Chord Shape
Now coming to the minor barre chord shapes, the first one we have is the A minor (Am). If you look at the barre chord shapes of A major and A minor, you can see them to be similar to one another.
The only difference between the major and minor barre chord shapes is that the minor version does not use the middle finger (2). As a result, with the change of one note, you can turn A major barre chord shape into A minor.
- Step – 1:- Place your index finger (1) across the 5th fret.
- Step – 2:- Place your ring finger (3) on the 7th fret at the 5th string.
- Step – 3:- Place your pinky finger (4) on the 7th fret at the 4th string.
- Step – 4:- Strum all 6 strings from down to above.
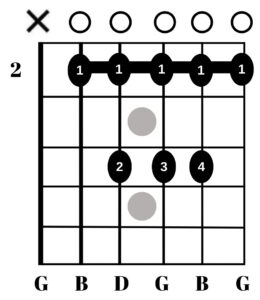
vii. The D Minor Barre Chord Shape
D Minor chords can be played using open or barre chord shapes. The D minor has three notes; those are D, F, and A. When playing D minor one of these notes has to be played in a different octave. Given below is the easiest and quickest barre chord shape for D minor, there are other shapes present as well, but this one allows you to quickly switch between chords gracefully when playing a song.
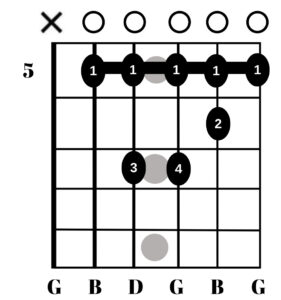
- Step – 1:- Place your index finger (1) on the 5th fret covering the 1st to 5th string to form a barre.
- Step – 2:- Place your middle finger (2) on the 6th fret at the 2nd string.
- Step – 3:- Place your ring finger (3) on the 7th fret at the 4th string.
- Step – 4:- Place your pinky finger (4) on the 7th fret at the 3rd string.
viii. The E Minor Barre Chord Shape
The open chord shape of E minor is one of the easiest guitar chords you can play on guitar. But the E minor is the one that makes things hard for any beginner. In the given below diagram, you need to use the index finger (1) to mute the 1st and 5th strings of the guitar, preventing them from ringing.
- Step – 1:- Place your index finger (1) on the 7th fret in such a way that it creates barre at the 1st and 5th string.
- Step – 2:- Place your middle finger (2) on the 8th fret at the 2nd string.
- Step – 3:- Place your ring finger (3) on the 9th fret at the 4th string.
- Step – 4:- Place your pinky finger (4) on the 9th fret at the 3rd string.
- Step – 5:- Strum strings from 1st to 5th only.
ix. The F Major Barre Chord Shape
The given below version of F major is the complete barre version. Yes, you can play the barred version at different positions of the fretboard based on the location of the root note. But this is the very first position in which the root note is present on the low E string, and the second root note is present on the A string.
Moreover, this is the most used position of the F major barre chord. This position is hard to learn due to the gap present between 1st and 2nd fret. As a result, it becomes difficult to compress all four fingers in such a small space. But again, a similar issue can be found at the position of the 10th fret.
- Step – 1:- Place your index finger (1) across the 1st fret in such a way that the inside of your finger is muting the 1st, 2nd, and 6th string.
- Step – 2:- Place your middle finger (2) on the 2nd fret at the 3rd string.
- Step – 3:- Place your ring finger (3) on the 3rd fret at the 5th string.
- Step – 4:- Place your pinky finger (4) on the 3rd fret at the 4th string.
- Step – 5:- Strum strings from 1st to 5th only.
x. The B Major Barre Chord Shape
B major chord, in general, is quite challenging, even if you are trying to play its open chord shape. There are a number of songs that use this particular chord, and the best way to play it is by using its barre chord shape.
Also, depending on the type of song you are playing, you have to mute some strings on the guitar, and you also have to change the strumming pattern. As a result, selecting a barred version to play you will be able to produce a much fuller and richer sound when playing the B major chord.
- Step – 1:- Place your index finger (1) on the 2nd fret from the 1st string to the 5th string to form a barre.
- Step – 2:- Place your middle finger (2) on the 4th fret at the 4th string.
- Step – 3:- Place your ring finger (3) on the 4th fret at the 3rd string.
- Step – 4:- Place your pinky finger (4) on the 4th fret at the 2nd string.
- Step – 5:- Strum guitar strings from 1st to 5th.
Learn to play more guitar chords here with Torrins.
Conclusion
So these were some of the essential barre chords that you should learn and practice to become a great guitar player. With the online barre chord practice, you get to learn new techniques which keep things interesting as it allows you to play songs like Rolling In The Deep by Adele, Story Of My Life by One Direction, Let Her Go by Passenger, and many more from your favorite artists.
With the knowledge and practice of barre chords on a guitar, you get to use more space on the fretboard, making it possible for you to move down the fretboard and learn more complex strings.