Easy Steps to Master Barre Chords, A Beginners Guide

Janvi Arora
- 30 September, 2024
- 12 min read

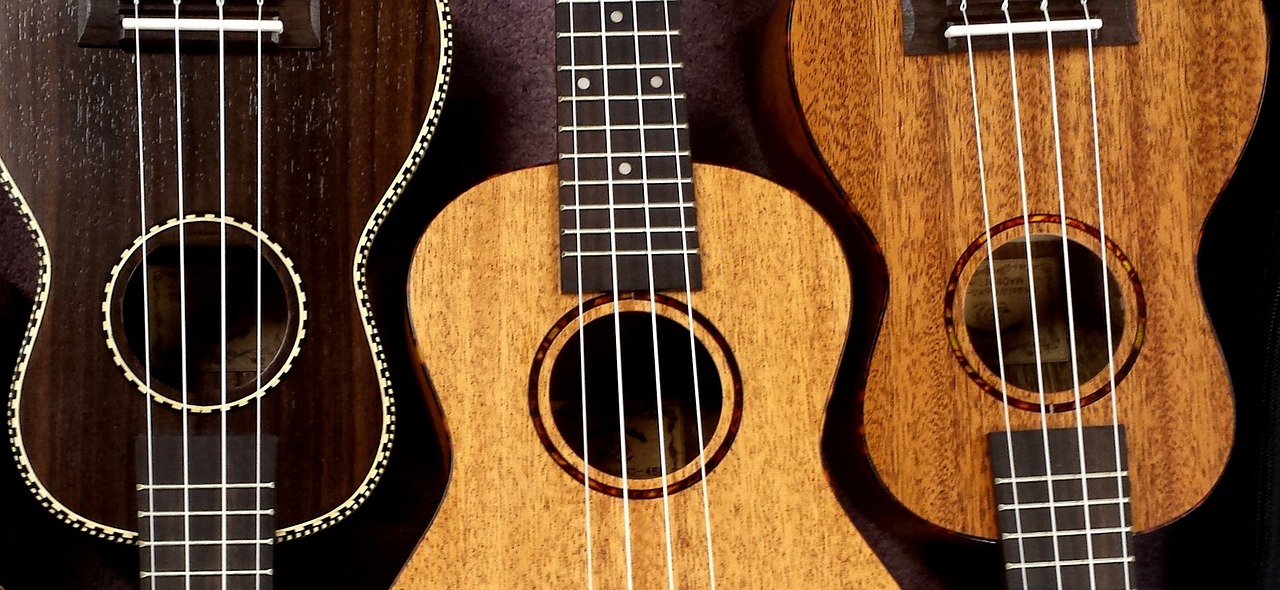
Barre chords – one shape to play all chords for all keys
Table of Contents
Barre chords are the first big challenge that beginner guitar players have to move past to continue their journey. A lot of beginners think about skipping barre chords, but that’s one of the biggest mistakes you can make!!
Jimmy Page, Elvis Presley, John Lennon, Jimi Hendrix, and other famous guitar players would have been nobody if they hadn’t taken the challenge of learning barre chords in their time.
Check out the artist series by Torrins on all these famous guitar players.

So, in this blog, we are going to introduce you to barre chords, what they are, why they are so important, barre chord-related exercises you can do, finger stretching exercises, along with crucial tips that will make playing barre chords easier for you. So, let’s begin.
You can also try our beginner guitar lesson series.
What Are Barre Chords?
Simply put, barre chords allow musicians to use the same chord position while moving it up and down the fretboard to play different chords. Once you master the skill of playing and using barre chords, you will be opening doors to endless possibilities.
To understand the importance of barre chords, let’s do a little exercise.
First, try to play an open G chord on your guitar.
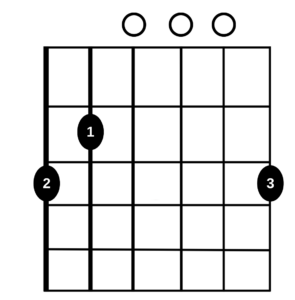
Now, when you are playing the chord, you are only fretting the 1st, 5th, and 6th string. The remaining 2nd, 3rd, and 4th strings will also be played in the open G chord version but you are not holding the strings at any position on the fretboard. This results in the sound to be somewhat amateurish, meaning that the G chord which you are producing isn’t as accurate as it should be in terms of musical composition.
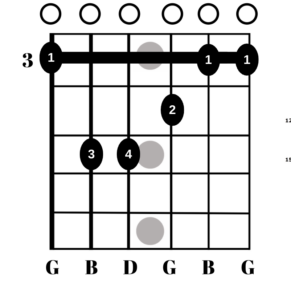
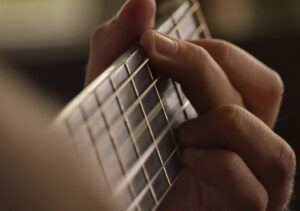
On the other hand, when you are playing the G barre chord version, you will be pressing your index finger (1) across the 3rd fret to create the barre. In addition to this, you will also be using a pinky finger (4) on the 5th fret at the 4th string. When you strum this position, the sound of the G chord will be more accurate and restrained.
Likewise, if you try to play the G barre chord on the 5th fret, 9th fret, or 12th fret, you will be using the same chord shape that you used at the 3rd fret. Thus, you can move up and down the fretboard using its entire length and fine-tune the chord by changing its octave according to your requirements.
This is what barre chords are made for; this is how barre chords separate guitarists from hobbyists.
Furthermore, when you join a band you have to match up your playing style with other guitarists. So, if they are playing notes on the lower part of the fretboard, you need to play the same notes high up on the neck. This is a common theme in a band that consists of more than one electric guitarist. The merger of similar chords on 2 different positions on the fretboard leads to a higher pitch and also makes a great-sounding mix in live setup.
Are Barre Chords And Bar Chords The Same?
Now we know there is considerable confusion on the internet, about “barre” chords or a “bar” chord and whether they are different. Well, there is no difference between these two; both of these are the same thing. Some people prefer to call it “barre,” while others use “bar” to represent these chords.
Barre Chord Tips And Techniques: Barre Chords For Beginners
Here are a few tips and techniques that will make learning barre chords easier for you.
Tip -1:- Keep Your Thumb On The lower side And Place It Halfway Down The Neck
When playing barre chords, it is essential to place your thumb at the back of the fretboard, to be more accurate you need to place it halfway down the neck. In case you keep the thumb too high, or you wrap it around the neck, your finger movement will be restricted, making it impossible to play barre chords.

You need to line up your thumb with your index finger or in between your index (1) and middle finger (2). When you keep the thumb in the correct position, you will automatically move your wrist close to the floor, giving your fingers the required amount of movement.
Tip – 2:- Use The Very Edge Of Your Index Finger
The flat face of your index finger is too soft and fleshy, making it not a suitable choice for putting hard pressure on the strings. Besides this, the index finger has two grooves present on the finger joints which also makes it hard to use the flat side for muting strings.
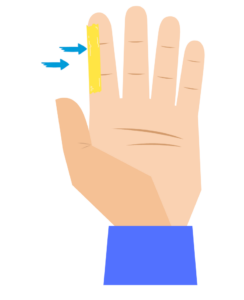
If we look at the other side, which is the edge of your finger, we will see it is bonier and has less flesh on it, thus, making it ideal for muting. To make the barre using the edge of your index finger you should be pushing the finger towards the headstock. This will cause a change in elbow position, and that’s where you need to use our 3rd tip.
Tip – 3:- Tuck Your Elbow
In order to push your index finger away towards the headstock, you must keep your elbows close to your body. The thing is, if you try to push away the index finger while your elbow is hanging in the middle of the air away from your body, it will be literally impossible to barre the required chords. You need to keep your arms as close as possible to your body to be in a comfortable position for playing guitar barre chords.
Tip – 4:- Keep Your Index Finger Close To The Fret
A lot of times, beginners make the mistake of putting extra pressure on the fret where the least amount of it is required. You have to place your finger right next to the fret with a flat face and then slowly roll it to the very edge to put your finger in the proper position.
Keep in mind that you don’t have to put your fingers on the fret; it has to be close or right next to the fret in such a way that some part of your index finger is covering the fret, but it is not applying pressure to it.
In addition to this, you need to make sure that the index finger is placed parallel to the fret. If you place it diagonally, it will go further away from the fret when you are playing on high strings.
Troubleshoot 1:- If you are not able to hear G or D strings, then you might have slightly arched your index finger and applied a bit more pressure to the outer strings, such as the high E string, B string, and low E string. You can avoid this mistake by keeping your index finger straight.
Troubleshoot 2:- On the other hand, if you are unable to hear B string or high E string, then you are bending the joints present in the largest and second largest part of your finger. To solve this problem, all you have to do is keep your index finger straight and lower the back joint of your index finger.
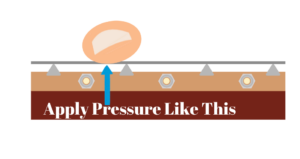
Think about pressing your index finger hardest in its center. It may seem a bit weird because you might say we were asking you to put equal pressure on all six strings; why change all of a sudden? Well, if you try to push the middle part of your index finger hard, the rest of the finger will automatically become straight.
Tip – 5:- Take A Use Of Your Arm Strength
During your practice sessions if you are feeling like your left hand or your thumb is getting tired, then you might want to perform some arm strength exercises to reduce pressure on it.
Apart from this, you can pull backward with your left arm and, at the same time, hug the body of the guitar between your chest and your right arm. Using this technique, you will be able to put enough pressure on the strings that you want to play.
Tip – 6:- Use Lighter Strings
The set of strings that comes with your guitar is somewhat heavy, to begin with. As a result, when you are practicing barre chords for the very first time it would be better if you restring your guitar with light gauge strings. You can go with 008 gauge or lighter; these will make the action of the strings flexible, and even soft pressure will be sufficient to make the guitar chords sound right.
Barre Chord Guitar Exercises
To play barre chord is one thing, but to make your fingers float on the fretboard is a completely different challenge that requires plenty of patience and practice. In this section, we are going to show you some of the highly beneficial exercises that you need to include in your guitar chord practice sessions so you, too, can rip the guitar like the Edge from U2 and create your own unforgettable solos.
i. Practice Slapping Your Index Finger On Different Positions Of the Fretboard
We know it might sound crazy, but trust us on this one: what you have to do is play any of the barre chords. Let’s take the example of the G major barre chord.
First, you play it like you normally do, then start slapping your index finger on the lower E string four times and while doing try to keep your fingers placed at the same spot on the fretboard.
After slapping your index finger four times, go to the higher string and play the same chord once again while picking the strings one by one.
Keep on repeating this exercise till you reach the bottom of the neck or your fingers get sore. If you repeat this exercise you will soon start to hear a cleaner version of the barred chords from your guitar playing.
ii. Create Muscle Memory For Barre Chords
Getting your fingers placed at the right spot on the fretboard is going to take some time, so here’s one way to speed up the process of muscle building. For this, you first need to play an open chord and see if it sounds right; if it does, you need to press the chords into the fretboard as hard as you can and keep your fingers in the same position for about 30 seconds.

After 30 seconds, give your fingers some rest, and then again repeat the process four to five times a day. What happens when you are pressing your fingers too hard on the fretboard is that you are telling your brain and muscles that the particular shape they are in currently is important and needs to be remembered.
iii. Start By Playing Barre Chords In The Middle Of The Neck
String tension is highest at the top and the bottom of the fretboard. As a result, it is not recommended to start learning barre chords with the F chord as it starts from the first fret.
The 7th fret is the best position for learning how to play barre chords for beginners.
Furthermore, a string might position itself in the joints of your index finger that you are using as a barre. To stop this mistake from happening again and again you can slide the index finger up or down a little bit to get the strings out from the joints.
Conclusion
So these were some of the important tips and exercises that will allow you to play barre chords with ease. A one footnote we would like to leave here in conclusion is that, don’t give up on playing guitar if you are not able to play barre chords at once. Mastering barre chords takes time; believe it or not, it took months for some of your favorite artists to play barre chords without making a mistake.
So don’t be hard on yourself; if you are feeling stuck, take a rest from practicing and come back again after a day or two, but don’t stop practicing. That’s it from our side; if you want to learn more about barre chords, make sure to check out our other blog, 10 Essential Barre Chord Shapes to master.
Till then, keep on learning and keep on shredding!!