
Learn to Play G7 Chord on Guitar

Janvi Arora
- 17 September, 2024
- 7 min read

Table of Contents
G7, which is pronounced as G dominant seventh, is known to be one of the most versatile chords that you can use while writing and composing music. With G7, you get the ability to add dissonant flavors to your progressions that sound similar to unforgettable delta blues artists.
G7 is the splash of color you need as it creates haunting stress and tension over consonant chords, making it a favorite among many guitarists. Once you start taking Guitar Lessons, you will understand the importance of G7 as it is present in countless songs from multiple genres like rock, blues, jazz, country, pop, and more. It is a staple chord that every guitarist needs to learn, no matter how far they are in the journey of becoming a guitarist.
Well, today, we are not just going to sing all praises for the G7 chord, today, with this blog, we are going to show you how you too can start playing the G7 chord on your guitar. Here we will discuss the musical theory behind G7, showcase a list of songs that feature G7 chords, provide finger placement for common G7 chord variations and finally, enlighten you with some tips and tricks that you can use while practicing G7 chord.
Understanding G7 Chord on Guitar
Let’s start with the basics by breaking the G7 chord into two parts, G & 7. G is the note, and 7 is the chord, which is made by using three notes all together, also known as a triad. When we combine these two, the G7 chord is made, which has the following notes:-
- G as the root note
- B as a major third note
- D is the perfect fifth note
- F as a minor seventh note.
When practicing Guitar Song Lessons, you play these notes in unison, and then it forms a G7 chord, which is a bit more complex and sounds much better in comparison to major and minor G chords.
G7 Guitar Chord Shape
Now that you understand the theory behind the G7 chord, here in this section we will discuss how the G7 chord is shaped, meaning what fingers you have to use and where you have to place them on the fretboard to produce the required sound.
There are multiple finger placement options that you can use to play G7 chords, but here, we are only talking about the most basic version. Once you are accustomed to this one, you can try other variations as well, which we will discuss in the later sections.
Here’s what you need to do:
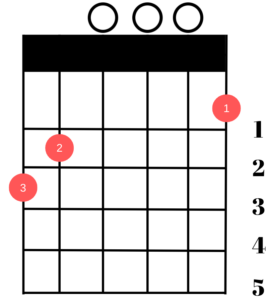
- Step – 1: Place your index finger (1) on the 1st fret at the 1st string.
- Step – 2: Put your middle finger (2) on the 2nd fret at the 5th string.
- Step – 3: Put your ring finger (3) on the 3rd fret at the 6th string.
- Step – 4: Strum all six strings from bottom to top.
G7 Chords Guitar Variations
To play G7 chords in a song, you require knowledge of its variations as they allow you to shift quickly from one chord to another in a more fluent manner. Here are some of the most crucial G7 chord variations that you should be practicing with your Free guitar lessons
i. G7 Guitar Chord 1 Finger Variation
If the basic variation of the G7 seems a bit difficult to you then try playing this variation first. Here you only need to use the index finger and make sure you don’t play the last 2 strings of the guitar that are bass heavy.
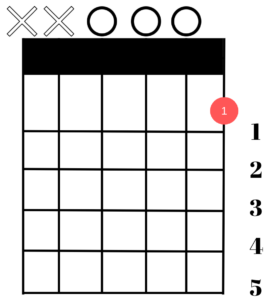
- Step – 1: Place your index finger (1) on the 1st fret at the 1st string.
- Step – 2: Strum strings from 1st to 4th and skip 5th and 6th string.
ii. G7 Barre Shape
With this variation, you will be using the index finger to form a barre across the fretboard. With this barre shape under your belt, you get to play the exact G7 shape at different positions of the fretboard. As a result, you can play G7 without having to worry about using open strings.
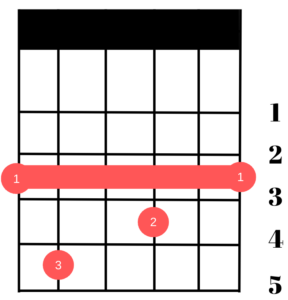
- Step – 1: Use your index finger (1) to form a barre on the 3rd fret across all 6 strings of the guitar.
- Step – 2: Put your middle finger (2) on the 4th fret at the 3rd string.
- Step – 3: Put your ring finger (3) on the 5th fret at the 5th string.
- Step – 4: Strum all 6 strings from bottom to top.
When it comes to playing barre chords, G7 is considered to be the easiest because here, you will be forming barre just a few frets away from the nut, making it much easier for beginners to place their index finger correctly on the fret.
iii. G7 Guitar Chord 3 Finger Variation
If you want to create a sound which is similar to that of a barre chord, but you are unable to play the barre version because of some reason then try this variation during your practice sessions.
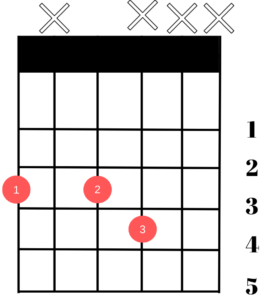
- Step – 1: Place your index finger (1) on the 3rd fret at the 6th string.
- Step – 2: Put your middle finger (2) on the 3rd fret at the 4th string.
- Step – 3: Put your ring finger (3) on the 4th fret at the 3rd string.
- Step – 4: Strum only 3rd, 4th and 6th string.
Piano Lessons
Bass Lessons
Piano Song Lessons
Songs that use G dominant 7 (G7 Guitar Chord)
Here is the list of artists that use G7 to add an extra layer of emotions and dramatic punch to their songs.
- Can’t Buy Me Love by The Beatles
- Eight Days A Week by The Beatles
- Freedom by Robbie Willams
- Jackson by Johnny Cash
- Pretty Women by Roy Orbison
- Promises by Eric Clapton
- When I Was Your Man by Bruno Mars
- Yesterday by The Beatles
Practice Tips and Exercises while Playing G dominant 7 Chord (G7 Guitar Chord)
One of the trickiest parts of playing the G7 chord is being able to stretch your index finger and middle finger apart from one another in such a way that both of them can land on the required fret position.
The distance between the two fingers is longer than their usual placing. As a result, it requires a bit of extra finger strength, which comes with practice, patience, and persistence. In addition to this, make sure you are not touching the D string with the soft part of your 2nd finger.
Using the very end of your fingers, along with pushing your hand position a bit forward, will help you in fretting the notes the right way.
Apart from this, here are a few things that you can do to get better at playing the G7 chord:
- When you start a new chord like G7, make sure you begin slowly; at first, you must focus on keeping your fingers in the right position; speed will automatically come later.
- Start memorizing the order at which you will be placing fingers on the fretboard. Start with the index finger always.
- Do not place your fingers exactly on the top of the metal fret because it will lead to muted sound.
- Lastly, keep your index finger close to the metal fret, this gives you more room to travel in between the chords and you will be able to execute the chord without having to face a buzzing sound.