
Mastering the Art of Guitar Strumming Patterns

Janvi Arora
- 19 July, 2024
- 12 min read

The universal mother tongue of any musical instrument is rhythm; and Strumming patterns are variations of alphabets, which make a guitar sing.
Table of Contents
We know that as beginners, most people tend to learn finger patterns along with positioning on the fretboard in order to start playing the guitar songs of their favourite artists. It’s quick and makes your friend believe you have what it takes to be a rockstar. But one of the crucial guitar techniques one needs to include in their guitar lessons is strumming patterns. The more strumming patterns available in your arsenal, the more you can do with your guitar.

On the surface, you might find strumming to be a simple practice, but in truth, the intricate musical notes that give the guitar its heartwarming sound can only be achieved by strumming. With this blog, we will teach you how to create music with a guitar and not simply play it. You will get tips on how to use a pick correctly, keep your body in the correct posture while playing guitar, and understand the workings of upstrokes and downstrokes along with muted strummings. So, let’s begin.
What are Guitar Strumming Patterns?
With guitar strumming patterns, you will acquire the knowledge of rhythm and timing, which is crucial for rock’n rolling. The guitar’s strumming pattern impacts the rhythm of a song, and it is also used to define the musical genre.
There are multiple ways of strumming a guitar; it can be done using the thumb, index finger, middle finger, and with a pick. Over time, you will build an intuitive strumming technique of your own as you optimize the moment according to your comfort.
One thing we would like to tell you before moving forward is that it is essential for every guitarist to learn strumming patterns in the beginning because it is easier to reinforce and implement them rather than unlearning faulty practices that you have already learned.
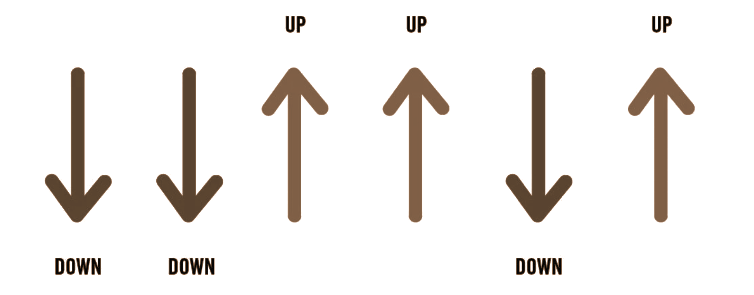
The Upstroke
In upstroke, the motion of your hand is in the upward direction, meaning towards the roof.
Here, you will be sweeping your strumming hand from the first string to the sixth string.
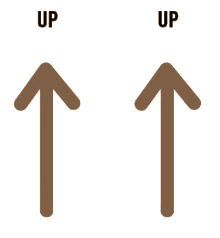
When you are performing the upstroke, you don’t need to hit all the strings because they are generally used for producing subtle or gentle sounds. As a result, when you are playing the upstroke, it is necessary that you start by hitting only the treble strings, which are the first three strings from the top.
The Downstroke
As we mentioned earlier, downstrokes are the first thing you need to learn when practising strumming because downstroking a guitar comes naturally as you start playing it.
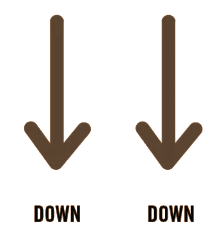
With a downward motion, you will be sweeping your strumming hands from the sixth string to the first string while putting equal force on each string. To produce a balanced and resonating tone from your guitar.
The combination of both upstrokes and downstrokes will result in a melodious sound when you add the different strumming patterns.
What are the techniques involved in strumming?
Need For The Right Posture
When you are learning or practising guitar chords, you should be comfortably seated. Sitting on a stool that has an upright back support will help you maintain the correct posture while keeping your body relaxed.

In addition to this, your guitar should be resting on your leg in such a way that it is balanced from both ends. Your strumming hands need to be placed a little in front of your guitar’s body such that no part of your hand feels stretched.
Coming to the strumming hand wrist, it needs to be resting near the bridge of the guitar, and you must be placing the pickup near the sound hole.
Check out our free lesson on Holding and Balancing a Guitar to learn the correct technique in great detail.
Understanding the Fundamentals of Guitar Strumming
Strumming is the foundation of guitar playing. But first, we need to talk about the right posture, and after that, the movement of your hands, which results in the strumming of guitar strings.

A strum or stroke is a sweeping action that is done by the guitarist’s weaker hand across the strings in an upward or downward direction.
Your fingers will brush against the guitar’s plectrum as you start strumming, and this results in the desired sound for which guitars are known for. Now, let’s look at the steps to get you started with your first strumming lesson:-
Step 1:- Hold your guitar in a proper stance where your strumming hand’s elbow gets a resting position on the guitar’s body.
Step 2:- Find a guitar pick and hold it in your weak hand, which you will be using for strumming.
Step 3:- With your pick, start strumming the strings precisely in between the sound hole and the bridge of the guitar.
Step 4:- One thing to note here is that you should start with downstrokes and, at the same time, play all strings with equal force. After you get comfortable with hitting all the strings in one downstroke, then you should start including upper strokes as well.
Step 6:- Make sure your strumming hand should be moving in a continuous flow of motion.
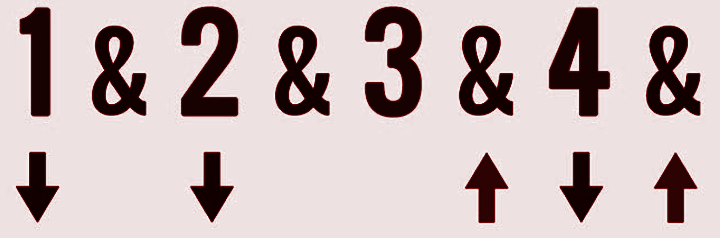
Understanding Strumming Chart
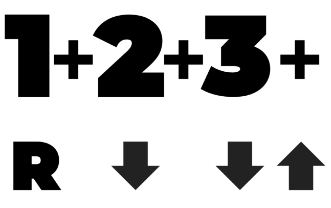
The above-mentioned guitar strumming chart has every symbol you need, and these are:-
- Down = ↓
- Up = ↑
- Mute = X/ empty space
When you add ‘muting’ to your strumming, it leads to the formation of unique rhythms, which can be used to make a song sound more creative. Also, during your practice sessions, you can mute all six chords and focus only on your strumming patterns to find your mistakes easily.
Essential Strumming Pattern
i. 4-Beat Downstrokes/ Downward Strumming
The four-beat downstrokes are pretty simple to follow through. They are also great for building your sense of timing, as they allow you to start practising more complex strumming styles in your musical voyage.
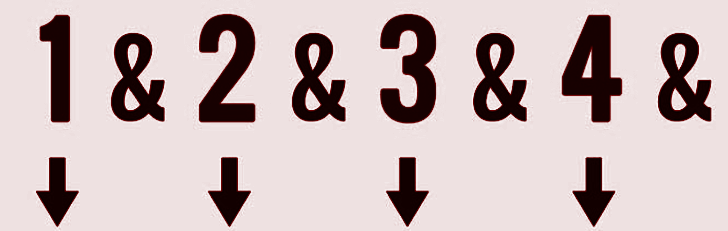
Step 1:- First, you need to start chanting “A one & two & three & four.”
Step 2:- After that, for everyone, two, three, and four, you will be playing a downstroke while skipping the “and” part, which is usually used for upbeat.
Step 3:- Keep repeating this until you are able to downstroke all six strings repeatedly at a faster rate.
A little assistance from a metronome tool will be a great way to get yourself in proper rhythm. Make sure you don’t sacrifice the accuracy of hitting all six strings for the sake of gaining speed.
ii. Down & Up Strokes
The second most common type of strumming pattern is “Down & Up,”
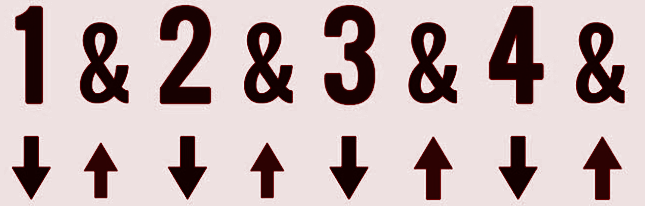
Step 1:- For this, you will again have to use the same rhythm of “A one & two & three & four.”
Step 2:- Here, in addition to downstrokes on every number, you will also be strumming upwards (upstrokes) for every “&.”
The downstrokes and upstrokes are the foundation of every single strumming pattern of a guitar. When you are practicing this strumming pattern, make sure not to lock your wrist, as it may result in an uneven pressing of strings.
iii. Muted Strum Pattern
This one is quite similar to the second strumming pattern, but hey, this one is pretty important, too, because you will be learning about muted strumming. With a muted strum, your guitar will produce a sound similar to that of percussion. Before you stress yourself what the muted strum is, it is better we explain to you it’s working.
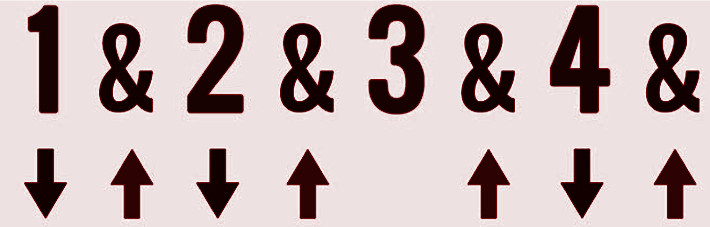
When you are performing a downstroke on your guitar, you will be letting off pressure from the fretting hand. Now, right before strumming through the strings, you will be using the fleshy palm of your strumming hand to mute the strings.
Step 1:- Now we play downstroke at ‘1,’ followed by upstroke at ‘&.’
Step 2: After that, downstroke at ‘2’ will again be followed by upstroke at ‘&.’
Step 3:- Here, you will be skipping or muting the upstroke at ‘3’, which you usually play, and finish it with an upstroke on the following ‘&.’
Step 4:- Lastly, play downstroke at ‘4’ with one last upstroke at ‘&.’
In case you feel muting a strum is difficult, you can also slow this down according to your comfort. After you fully understand the technique, you get the freedom to add muted strum wherever you want.
iv. Muting An Upstroke & Downstroke
This strumming pattern might feel like a challenge at the start. But after learning it from Torrin’s experts you will be happy to see the number of songs you can play using this strumming pattern.
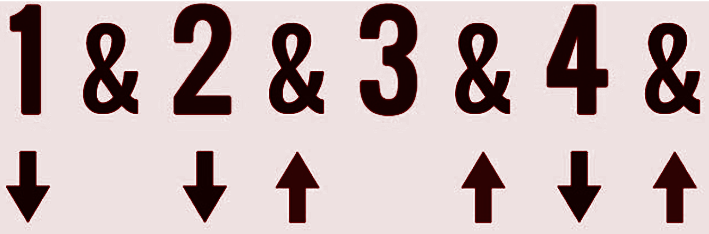
Here, you will be muting the downstroke on the 3rd downbeat. In addition to that, you will also have to use the upstroke, which comes on 1st upbeat, or the “&,” which comes right after the first downstroke at “one.”
Step 1:- First, play the downstroke at “a 1.” Then, mute the upbeat or “&” part of the pattern.
Step 2:- At “2,” once again, play a downstroke followed by an upstroke on the second beat, which is ‘&.’
Step 3:- Mute the downbeat at ‘3’, and again play an upstroke on consecutive ‘&.’
Step 4:- Lastly, all you have to do is play a downstroke on the 4th downbeat and once again upstroke on ‘&.’
By learning how to mute two beats at different positions, you will slowly build rhythmic prowess with your guitar. So don’t mute *pun intended* your practice for this one, or the rock Gods will not grant you their blessings.
v. Pattern With A Long Pause
After you acquire the skill of skipping two strokes in one pattern, you can take on the challenge of skipping a whole quarter note or two eighth notes. Again, this might not feel quite intuitive when you begin, but this is something you need to learn to play guitar at the top level.
You will be playing fewer strokes in this pattern in comparison to others. But hey, don’t think of it as an easy one; this pattern takes a lot of time to master, so learn its basics carefully.
Step 1:- At the start, you need to play one downstroke and then mute the following upstroke,
which comes on ‘&.’
Step 2:- Then again, play downstroke at ‘2’.
Step 3:- Now comes the long pause; here, you have to mute not just the upstroke present at ‘&’ but also the downstroke at ‘3’.
Step 4:- Again, you will be playing upstroke at ‘&,’ then move to downstroke at ‘4,’ to end the pattern with one last upstroke at finally ‘&.’
The challenge that every learner faces when playing this strumming pattern is keeping their strumming movement going for 2nd and 3rd notes without hitting any strings. All your inner strength will urge you to do it, or your hands will stop automatically. But at all costs, you have to keep it going. With time and practice, you will attain a steady natural flow of strumming.
Conclusion
Now that we have covered all the basics of guitar strumming for you. We believe that a little bit of consistent practice of these strumming patterns will get you to woo crowds of hundreds and thousands of people in no time.
Before we hit out to play our next gig, we would like to mention a very famous quote from our beloved Eric Clapton. He said, “Every time you pick up your guitar to play, play as if it’s your last time.” What Eric says, we follow, and we ask you to do the same. So even when you are practising, put your soul into it, and don’t feel let down if you cannot play a specific strumming pattern, song, or note. The guitar, my friend, is one of those musical instruments that will reward you for your patience.
So pick your guitar every day, devote half an hour to 1 hour, and in less than three months, we are sure you will be able to play all those songs that play on a loop on your Spotify, Apple Music, and others.
If you are looking for comprehensive and well-explained guitar lessons, Torrins can help you out. Check out our platform for lessons based on all necessary topics and skills you need to learn to be well on your way to guitar mastery. From lessons on the anatomy of guitar to complex topics like hammers ons and palm muting, we have something for everyone, regardless of their skill level. We also feature hundreds of guitar song lessons on our page, so tune into them and start strumming along! If you’re a beginner, check out our free beginner’s guitar lesson to understand our curriculum and teaching style. Happy learning and practising!
See you on the other side of the stage, good luck!


